I never thought I'd admit that a peach cobbler recipe is better than the one I got at a Grand Junction peach stand, but I think this one wins the prize.
Make it. You won't regret it.
http://rachelschultz.com/2012/08/06/best-cobbler-youve-ever-had/
Showing posts with label dessert. Show all posts
Showing posts with label dessert. Show all posts
Monday, August 12, 2013

Tuesday, December 20, 2011
Cream Pie (Coconut, Banana, Chocolate)
Recipe Contributed by Rachel Nielson
First of all, why am I the only person who ever posts anymore? Since when did I become the domestic sister??
My husband and I recently moved from Buffalo, New York, and anyone who is familiar with western New York knows about the grocery store called Wegmans. It is amazing. Truly. We miss it daily. One of the many amazing things about Wegmans is the phenomenal in-store bakery. Over the four years that we lived in Buffalo, I became addicted to their cream pies. They sell small "personal" size ones for $4 (I put personal in quotes because these little pies should probably feed two, but I could easily eat one by myself), and I often found myself eating one after a long grocery trip. Mmmmm. Heaven. My personal favorite was their banana cream, and I've been craving it ever since we moved. Well, over Thanksgiving weekend, my mother-in-law made a bunch of cream pies, and I think hers are almost as good as Wegmans!! And guess what?? They're super easy! You basically make the same "base" (a creamy custard) for all of the pies, but you add different ingredients at the end to make the pies different flavors. I love them all!
Sally's Cream Pies
5 Tbsp cornstarch
1 cup sugar*
1/4 teaspoon salt
2 1/2 cups milk
3/4 cup half-n-half
3 egg yolks (beaten)
2 Tablespoons butter
1 teaspoon vanilla
Baked 9-inch pie shell (this can be homemade or storebought)
*For a chocolate cream pie, reduce the sugar to 3/4 cup.
1. Mix cornstarch, sugar, and salt in 3 quart saucepan.
2. Add milk and cream and cook over medium heat until smooth and think, stirring constantly.
3. Pour small amount of hot mixture into beaten egg yolks; blend, then pour back into saucepan.
4. Cook another 2-3 minutes. (I do a full three minutes because when I've done two minutes, the pies didn't ever set up.)
5. Remove from heat and add butter and vanilla.
6. Mix in flavoring:
Coconut Cream: Add 1/2 cup coconut to pie filling.
Banana Cream: Slice two bananas into the pie shell and pour filling over the bananas.
Chocolate Cream: Don't forget to decrease sugar when making the filling! Add 1/2 cup chocolate syrup to the cooked filling.
7. Pour filling into baked pie shell and refrigerate at least 3-4 hours or overnight. Top with whipped cream!
First of all, why am I the only person who ever posts anymore? Since when did I become the domestic sister??
My husband and I recently moved from Buffalo, New York, and anyone who is familiar with western New York knows about the grocery store called Wegmans. It is amazing. Truly. We miss it daily. One of the many amazing things about Wegmans is the phenomenal in-store bakery. Over the four years that we lived in Buffalo, I became addicted to their cream pies. They sell small "personal" size ones for $4 (I put personal in quotes because these little pies should probably feed two, but I could easily eat one by myself), and I often found myself eating one after a long grocery trip. Mmmmm. Heaven. My personal favorite was their banana cream, and I've been craving it ever since we moved. Well, over Thanksgiving weekend, my mother-in-law made a bunch of cream pies, and I think hers are almost as good as Wegmans!! And guess what?? They're super easy! You basically make the same "base" (a creamy custard) for all of the pies, but you add different ingredients at the end to make the pies different flavors. I love them all!
Sally's Cream Pies
5 Tbsp cornstarch
1 cup sugar*
1/4 teaspoon salt
2 1/2 cups milk
3/4 cup half-n-half
3 egg yolks (beaten)
2 Tablespoons butter
1 teaspoon vanilla
Baked 9-inch pie shell (this can be homemade or storebought)
*For a chocolate cream pie, reduce the sugar to 3/4 cup.
1. Mix cornstarch, sugar, and salt in 3 quart saucepan.
2. Add milk and cream and cook over medium heat until smooth and think, stirring constantly.
3. Pour small amount of hot mixture into beaten egg yolks; blend, then pour back into saucepan.
4. Cook another 2-3 minutes. (I do a full three minutes because when I've done two minutes, the pies didn't ever set up.)
5. Remove from heat and add butter and vanilla.
6. Mix in flavoring:
Coconut Cream: Add 1/2 cup coconut to pie filling.
Banana Cream: Slice two bananas into the pie shell and pour filling over the bananas.
Chocolate Cream: Don't forget to decrease sugar when making the filling! Add 1/2 cup chocolate syrup to the cooked filling.
7. Pour filling into baked pie shell and refrigerate at least 3-4 hours or overnight. Top with whipped cream!
Monday, July 11, 2011
Decadent Dipped Pretzel Rods
I have had these before and seen them around, but we were reminded of the idea while browsing our favorite recipe website, Our Best Bites, for shower food ideas. They have a very detailed post about dipping pretzels, if you'd like more info. It is pretty self explanatory, though. Here's what we did....

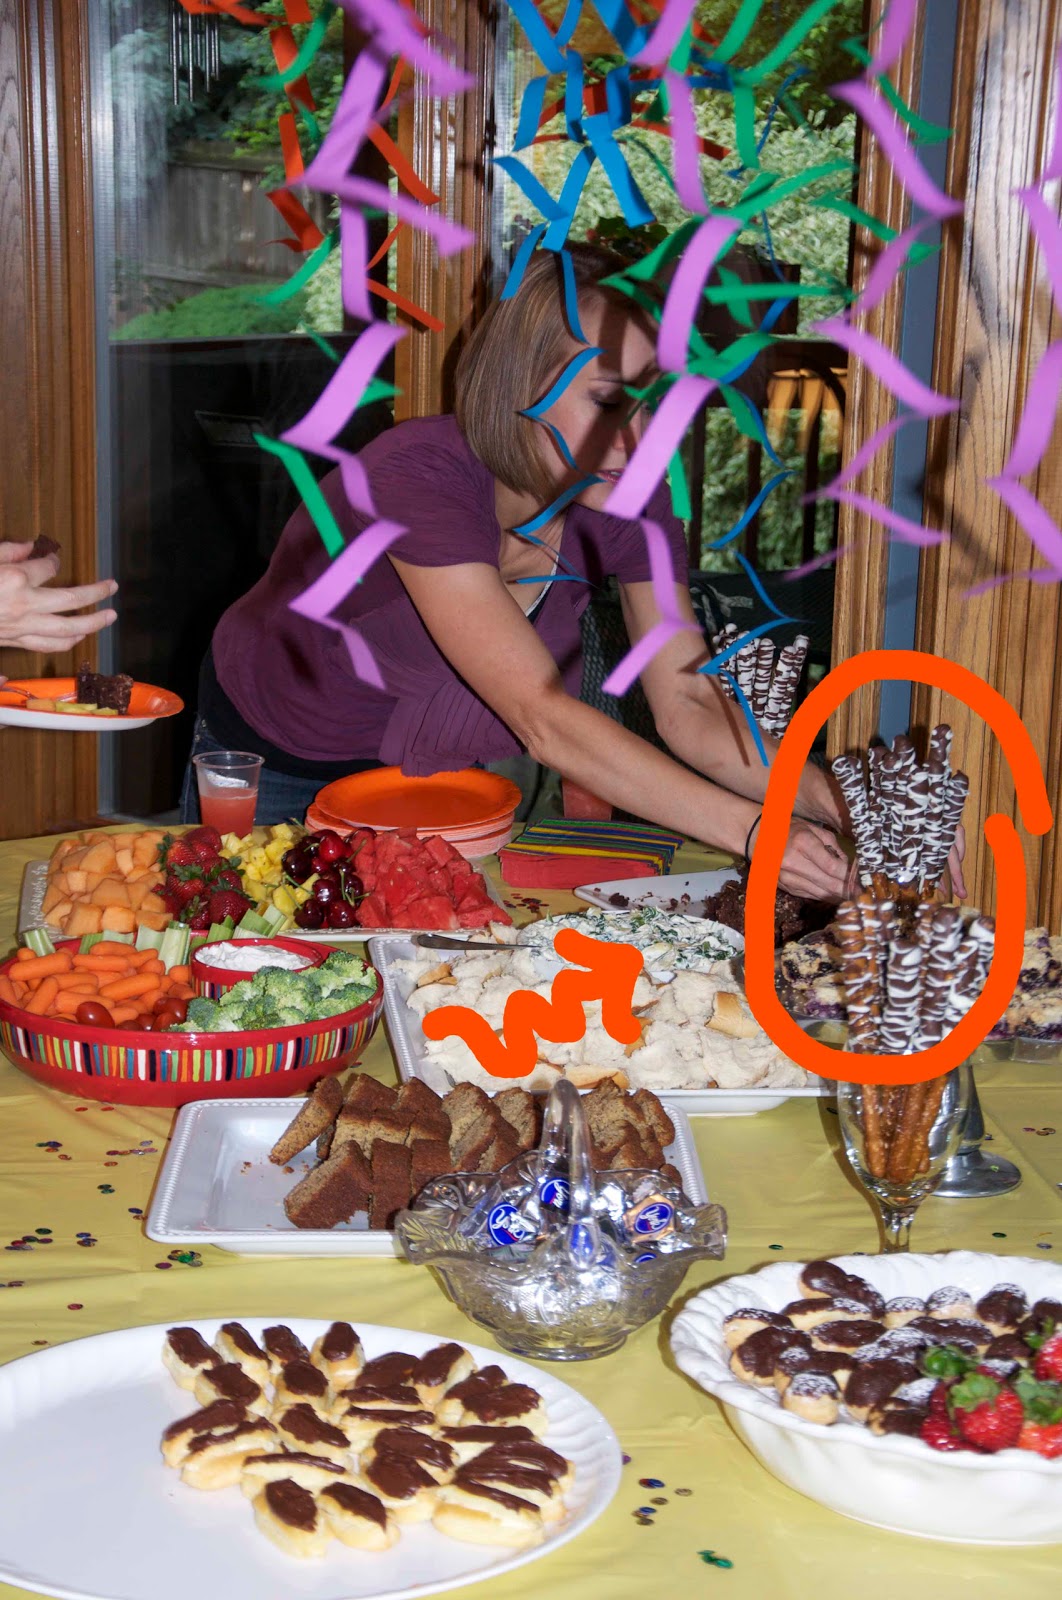
Decadent Dipped Pretzel Rods
Pretzel Rods (We used Snyder's brand....apparently the Walmart brand break easily, so avoid those.)
Caramel (The melting bits that come in the baking section are great....no unwrapping!)
Chocolate (Either chocolate chips combined with shortening to thin it out or "bark," which is made for melting.)
Candy or other coatings (crushed candy bars, graham crackers, coconut flakes, etc.)
Melt the chocolate (we did milk chocolate, white chocolate, and mint chocolate) and caramel in MUGS. Mugs are easy to tip up and manipulate. Dip the pretzel, let the excess run back into the mug, and lay on wax paper or a cooling rack. (Note: If you use a cooling rack---like we did---then remember to put wax paper UNDER it---like we did not---so that you won't have a huge mess stuck to your counter. Ugh.) We loved the combo of dipping in caramel, letting it cool, and then dipping it in chocolate. A yummy surprise! You can roll them in toppings or drizzle other chocolates on top. Our favorite combination, for both taste and appearance, was caramel with a layer of milk chocolate on top, drizzled for effect with white chocolate. We put them in cups and they were both tasty and cute!
Thursday, July 7, 2011
Cheesecake Brownies
Remember us? We're alive! We've just been busy moving! Rachel and I (Sarah) both just moved home to Denver for the next stage of our husbands' training. We will try to make up for our absence with some new recipes to share soon!
Last night we had a baby shower for....RACHEL! That's right! Remember that "Hoping to Adopt" button? Did you notice that it disappeared? Well it did, and there's a reason! Rachel and her hubby will be adopting a baby boy in August, and we threw her a baby shower to prepare last night. It was a great success---lots of gifts and good food! Over the next couple of days I will post a few of the recipes that we used to prepare food for the shower, starting with a surefire hit, which I often use for events where I need something easy to bring that will still impress: Cheesecake Brownies! Enjoy!

One Brownie Mix of your choice (and the ingredients that you will need to make it)
8 ounces cream cheese, softened
1/4 cup sugar
1 egg yolk
1/2 teaspoon vanilla extract
Make brownie mix and pour into a greased pan. Whisk together cream cheese, sugar, egg yolk, and vanilla extract. Drop small dollops of the cream cheese mixture over the brownie batter in the baking pan, then run a butter knife through the batter to create swirls. Bake as directed.
*The cheesecake portion of this recipe came from The America's Test Kitchen Family Baking Book.


Last night we had a baby shower for....RACHEL! That's right! Remember that "Hoping to Adopt" button? Did you notice that it disappeared? Well it did, and there's a reason! Rachel and her hubby will be adopting a baby boy in August, and we threw her a baby shower to prepare last night. It was a great success---lots of gifts and good food! Over the next couple of days I will post a few of the recipes that we used to prepare food for the shower, starting with a surefire hit, which I often use for events where I need something easy to bring that will still impress: Cheesecake Brownies! Enjoy!

Cheesecake Brownies*
One Brownie Mix of your choice (and the ingredients that you will need to make it)
8 ounces cream cheese, softened
1/4 cup sugar
1 egg yolk
1/2 teaspoon vanilla extract
Make brownie mix and pour into a greased pan. Whisk together cream cheese, sugar, egg yolk, and vanilla extract. Drop small dollops of the cream cheese mixture over the brownie batter in the baking pan, then run a butter knife through the batter to create swirls. Bake as directed.
*The cheesecake portion of this recipe came from The America's Test Kitchen Family Baking Book.


This isn't Rachel's baby, but he sure is a cutie! She's going to be an AWESOME mom!!!
CONGRATULATIONS, RACHEL!!!
Sunday, April 10, 2011
Caramel Corn

Caramel Corn
2 sticks butter
1 1/3 cups sugar
1/2 cup Light (White) Karo syrup
1 teaspoon vanilla
Pop the popcorn. Our popcorn popper can only handle 1/3 cup of the kernels at one time. Combine butter, sugar, Karo, and vanilla in a sauce pan. Bring to a boil and let boil 1 1/2 minutes, stirring all the time. (THIS IS WHERE YOU NEED TWO PEOPLE.) Pour the caramel mixture over the popcorn and stir together. Ball on wax paper and let dry out. Make a day ahead when possible to avoid super-stickiness.

Enjoy!
Saturday, April 9, 2011
Molten Lava Chocolate Cakes...yum yum yummer
This recipe was contributed by Rachel Nielson.
These molten lava cakes are so delicious and so easy that I am tempted to make them all the time. It's possible that I made them twice last week. You can bake them in ramekins, custard cups, or even just ceramic bowls.
2/3 cup semi-sweet chocolate chips
1/2 cup (1 stick) butter
1 cup powdered sugar
2 whole eggs
2 egg yolks
6 Tbsp flour
Preheat oven to 425. Butter four custard cups. Place on baking sheet. Microwave chocolate chips and butter in large bowl until butter is melted. Stir until the chocolate is completely melted. Stir in powdered sugar until well blended. Whisk in eggs and egg yolks. Stir in flour. Divide batter between cups.
Bake 13-14 minutes or until sides are firm but centers are soft (and runny and gooey). Let stand 1 minute. Run knife around cakes to loosen. Invert cooks into dishes. Serve with vanilla ice cream!
These molten lava cakes are so delicious and so easy that I am tempted to make them all the time. It's possible that I made them twice last week. You can bake them in ramekins, custard cups, or even just ceramic bowls.
2/3 cup semi-sweet chocolate chips
1/2 cup (1 stick) butter
1 cup powdered sugar
2 whole eggs
2 egg yolks
6 Tbsp flour
Preheat oven to 425. Butter four custard cups. Place on baking sheet. Microwave chocolate chips and butter in large bowl until butter is melted. Stir until the chocolate is completely melted. Stir in powdered sugar until well blended. Whisk in eggs and egg yolks. Stir in flour. Divide batter between cups.
Bake 13-14 minutes or until sides are firm but centers are soft (and runny and gooey). Let stand 1 minute. Run knife around cakes to loosen. Invert cooks into dishes. Serve with vanilla ice cream!
Saturday, February 26, 2011
Chocolate Fudge Jr Mint Centered Cupcakes

I found these cupcakes on Picky Palate and made them for a baby shower recently. They were an unbelievable hit! They were crazy easy, and I think they're worth preserving here for myself and sharing with all of our followers. (Not that they are too many of you yet, but still! Those who do follow deserve to taste these amazing little taste treats!) Head to her website, or see below, next time you need to impress in a hurry!
Chocolate Fudge Jr Mint Centered Cupcakes
4 eggs
1/2 Cup vegetable oil
1/2 Cup water
1 small box instant chocolate pudding mix
1/2 Cup sour cream
1 Cup chocolate chips
3 4 oz boxes Jr Mints (look for them on sale, I found them for $1.00)
Favorite Vanilla or Cream Cheese Frosting
*Rachel thinks they'd be delicious with chocolate frosting too.
Preheat oven to 350 degrees F. In a stand or electric mixer, add the cake mix, eggs, oil, water, pudding mix, sour cream and chocolate chips. Mix on medium for 2 minutes or until well combined and somewhat thick. Scoop into 24 paper lined muffin cups. Press 3 JR mints into the center of each cupcake center. Bake for 20-25 minutes or until toothpick comes mostly clean from center. Let cool completely and frost with your favorite vanilla or cream cheese frosting.
Makes 24 cupcakes.
Sunday, December 19, 2010
Oreo Truffles
This recipe was contributed by Tia Hammer Stokes, via Sarah McKenna. I've had these at parties before. Yum!
1 package of Oreos (double stuffed if you want)
1 package of softened cream cheese
Chocolate (white, dark, whatever you prefer) or almond bark for melting
Cookie sheet lined with wax or parchment paper
1. Beat the Oreos to a pulp however necessary. Pastry cutter, mallet, potato masher, rolling pin etc. No chunks.
2. Mix Oreos with cream cheese (we used a Kitchen Aid).
3. Roll into balls (like 1 inch or so), insert a toothpick in the top of each one and chill in fridge for close to an hour or freezer for half an hour on a cookie sheet lined with parchment or wax paper.
4. Melt the chocolate or bark according to directions. Dip the balls using the tooth pick as a handle.
5. At this point you can get fancy and stand the truffles toothpick side down in a block of foam to prevent a flat side (it still tastes the same if you don't) or just put them back on the cookie sheet (parchment paper). Let them harden/cool (this part is hard because you really want to eat them.).
Holiday Party Note:
You can get really creative and dip them again half way in red colored chocolate or plain milk chocolate or green melted chocolate in a ziploc with a hole in the corner to make drizzled stripes.....blah blah blah, but I don't think I could wait that long to consume them.
Oreo Truffles
1 package of Oreos (double stuffed if you want)
1 package of softened cream cheese
Chocolate (white, dark, whatever you prefer) or almond bark for melting
Cookie sheet lined with wax or parchment paper
1. Beat the Oreos to a pulp however necessary. Pastry cutter, mallet, potato masher, rolling pin etc. No chunks.
2. Mix Oreos with cream cheese (we used a Kitchen Aid).
3. Roll into balls (like 1 inch or so), insert a toothpick in the top of each one and chill in fridge for close to an hour or freezer for half an hour on a cookie sheet lined with parchment or wax paper.
4. Melt the chocolate or bark according to directions. Dip the balls using the tooth pick as a handle.
5. At this point you can get fancy and stand the truffles toothpick side down in a block of foam to prevent a flat side (it still tastes the same if you don't) or just put them back on the cookie sheet (parchment paper). Let them harden/cool (this part is hard because you really want to eat them.).
Holiday Party Note:
You can get really creative and dip them again half way in red colored chocolate or plain milk chocolate or green melted chocolate in a ziploc with a hole in the corner to make drizzled stripes.....blah blah blah, but I don't think I could wait that long to consume them.
Wednesday, December 15, 2010
Coffee Cake and the Big Winner!
Congratulations to the winner of our first GIVEAWAY!
And the winner is . . . . . Sara Lee!
Please email your full name and address to forcedtocook@gmail.com ASAP so I can get this fun little package to you in the mail before I leave for the holidays!
Thank you to everyone who participated!
And NOW for the up-until-now Super Duper Secret COFFEE CAKE RECIPE! Yum! ENJOY!

2 cups flour
½ cup sugar
½ cup brown sugar
1 tsp. baking soda
½ tsp. baking powder
½ tsp. salt
1 tsp. cinnamon
1 cup buttermilk
2/3 cup shortening
2 eggs
Topping:
½ cup brown sugar
½ tsp. cinnamon
½ tsp. nutmeg
Glaze:
1 cup powdered sugar
6-8 tsp. milk
½ tsp. vanilla
Cream batter thoroughly with a mixer. Pour into a greased 9x13 inch rectangular cake pan. Mix topping in a small bowl with a fork. Sprinkle evenly over cake batter. Cover and refrigerate overnight (or bake immediately uncovered). Bake at 350 degrees for 25-30 minutes until toothpick comes out clean. Pour glaze over the top of the cake immediately.
And the winner is . . . . . Sara Lee!
Please email your full name and address to forcedtocook@gmail.com ASAP so I can get this fun little package to you in the mail before I leave for the holidays!
Thank you to everyone who participated!
And NOW for the up-until-now Super Duper Secret COFFEE CAKE RECIPE! Yum! ENJOY!

COFFEE CAKE!
Cake: 2 cups flour
½ cup sugar
½ cup brown sugar
1 tsp. baking soda
½ tsp. baking powder
½ tsp. salt
1 tsp. cinnamon
1 cup buttermilk
2/3 cup shortening
2 eggs
Topping:
½ cup brown sugar
½ tsp. cinnamon
½ tsp. nutmeg
Glaze:
1 cup powdered sugar
6-8 tsp. milk
½ tsp. vanilla
Cream batter thoroughly with a mixer. Pour into a greased 9x13 inch rectangular cake pan. Mix topping in a small bowl with a fork. Sprinkle evenly over cake batter. Cover and refrigerate overnight (or bake immediately uncovered). Bake at 350 degrees for 25-30 minutes until toothpick comes out clean. Pour glaze over the top of the cake immediately.
Friday, December 10, 2010
Poppy Seed Cake
This recipe was contributed by Rachel's sister-in-law, Ashley Nielson Cuoio. This is one of her husband Nate's favorite desserts, and he's not even a big sweets guy, so that's really saying something! This recipe came from his Grandma Cuoio and it is super easy. She has made this for years and she swears it has turned out every time. You just throw in all the ingredients and turn the mixer on.
This cake is like a pound cake but it is way tasty and moist. This cake even freezes well so if only want a few pieces you can put half in the freezer for some other time.
3 cups flour
2 1/2 cups sugar
1 1/2 teaspoons salt
1 1/2 teaspoons baking powder
3 eggs
1 1/2 cups milk
1 1/8 cups vegetable oil
2 teaspoons poppy seeds
1 1/2 teaspoons vanilla extract
1 1/2 teaspoons almond extract
Dab of butter--I would say 1 Tbsp
Mix all ingredients together and beat for 2 minutes.
Grease and lightly flour bundt pan or two 9X5 loaf pans.
Bake for 50 minutes - 1 hour at 350 degrees.
This cake is like a pound cake but it is way tasty and moist. This cake even freezes well so if only want a few pieces you can put half in the freezer for some other time.
Poppy Seed Cake
3 cups flour
2 1/2 cups sugar
1 1/2 teaspoons salt
1 1/2 teaspoons baking powder
3 eggs
1 1/2 cups milk
1 1/8 cups vegetable oil
2 teaspoons poppy seeds
1 1/2 teaspoons vanilla extract
1 1/2 teaspoons almond extract
Dab of butter--I would say 1 Tbsp
Mix all ingredients together and beat for 2 minutes.
Grease and lightly flour bundt pan or two 9X5 loaf pans.
Bake for 50 minutes - 1 hour at 350 degrees.
Wednesday, December 8, 2010
Chocolate Chip Cheesecake Ball
This recipe was contributed by Ida Zeiler, a fan of the blog. We are a fan of her delicious-looking recipes! Thanks, Ida! Look for more to come from her in the next few days! I can't wait to try this chocolate chip cheescake ball! Seems like the perfect thing to take to a holiday party!
Chocolate Chip Cheesecake Ball
ingredients:
1 [8oz] package cream cheese, softened
1/2 cup butter, softened
3/4 cup confectioners' sugar [powdered sugar]
2 Tbsp brown sugar
1/2 tsp vanilla extract
3/4 cup miniature semisweet chocolate chips
3/4 cup finely chopped pecans
directions:
1 - in a medium bowl, beat together cream cheese and butter until smooth. Mix in powdered sugar, brown sugar and vanilla. Stir in mini chocolate chips
2- put a good sized piece of saran wrap over a cereal bowl. Place the batter in the cereal bowl [now seated in the wrap] and cover the batter with the edges of the wrap.
3- chill for at least 2-3 hours. BEST if chilled overnight
4- lay a new piece of saran wrap on the counter. Evenly lay out a square of pecans. Take the batter into your hands and mold it into a ball. Then roll in the ball in the pecans. Place it on the center of a serving plate. Use your hands to press the pecans that did not already stick [look for bare areas and cover them].
** Serve with cinnamon graham crackers around the ball
Saturday, August 28, 2010
Chunky Peanut Butter Chocolate Bars

Chunky Peanut Butter Chocolate Bars
1 box plain yellow cake mix
1 cup chunky peanut butter
8 Tablespoons (1 stick) butter, melted
2 large eggs
1 bag (12 ounces, 2 cups) semisweet chocolate chips
1 can (14 ounces) sweetened condensed milk
2 Tablespoons butter
1 cup sweetened flaked coconut
2 teaspoons vanilla extract
1. Preheat oven to 325 degrees F. Set aside an ungreased 9x13 baking pan.
2. Place the cake mix, peanut butter, melted butter, and eggs into a large mixing bowl. Blend with an electric mixer on low speed for 1 minute. The mixture will be thick. Set aside 1 1/2 cups for the topping. Using your fingertips to spread it out, press the remainder of the dough evenly over the bottom of the pan as a crust. Set aside.
3. For the filling, place the chocolate chips, condensed milk, and 2 Tablespoons butter inot a medium-size heavy saucepan over low heat. Stir and cook until the chocolate is melted and the misture is well combined, about 3 or 4 minutes. Remove the pan from the heat and stir in the coconut and vanilla until well distributed. Pour the chocolate mixture over the crust and spread evenly. Using your fingers, crumble to reserved crust dough and scatter evenly.
4. Bake until the cake is light brown, about 25 to 30 minutes. Remove the pan from the oven and let it cool on a wire rack for 30 minutes.
Thursday, August 19, 2010
Grand Junction Peach Cobbler
This recipe was contributed by Sarah McKenna. It is the favorite dessert of Ryan Nielson, Rachel's hubby and Sarah's brother-in-law!
Don't you just LOVE peach season?! I do. Whenever I bite into a juicy, ripe peach I think of poor Kramer with his damaged sense of taste not being able to enjoy those precious Mackinaw peaches! (That one's for you, Laura!) They are such a sweet treat! There are many delectable ways to bake with peaches, including my mom's famous fresh peach pie, but today I want to focus on my current craving and obsession: peach cobbler. Yum! Rachel got this recipe at a road-side peach stand in Grand Junction, Colorado, and it is the best cobbler recipe any of us has ever tasted. Top it with a little vanilla ice cream (the slow churned, half fat Edy's kind is shockingly yummy for low fat!) and you can't get a much more delicious summer treat. This particular recipe is super easy. I have made it several times recently, but every time I forget to take a picture. Oh well. Enjoy!
Don't you just LOVE peach season?! I do. Whenever I bite into a juicy, ripe peach I think of poor Kramer with his damaged sense of taste not being able to enjoy those precious Mackinaw peaches! (That one's for you, Laura!) They are such a sweet treat! There are many delectable ways to bake with peaches, including my mom's famous fresh peach pie, but today I want to focus on my current craving and obsession: peach cobbler. Yum! Rachel got this recipe at a road-side peach stand in Grand Junction, Colorado, and it is the best cobbler recipe any of us has ever tasted. Top it with a little vanilla ice cream (the slow churned, half fat Edy's kind is shockingly yummy for low fat!) and you can't get a much more delicious summer treat. This particular recipe is super easy. I have made it several times recently, but every time I forget to take a picture. Oh well. Enjoy!
Peach Cobbler*
*We suggest 1 1/2 - ing the topping if you want some extra gooey goodness. Your call. :)
1 stick (1/2 cup) butter
2 cups sugar (SEPERATELY)
3/4 cup milk
1 cup flour
1 1/2 teaspoon baking powder
dash salt
cinnamon to taste
4-6 peaches, peeled and sliced
1. Preheat oven to 350 degrees.
2. Melt butter in the bottom of a 9x13 pan.
3. Mix flour, ONE cup sugar, baking powder, and salt in a bowl.
4. Add milk.
5. Pour batter into the pan over the butter, but don't mix/stir.
6. Lay peaches over the top of the batter.
7. Sprinkle ONE cup sugar over the peaches. Sprinkle cinnamon over the peaches to taste.
8. Bake at 350 degrees until golden brown, about 45 minutes to one hour.
9. Top with ice cream and enjoy!
Thursday, July 29, 2010
Brownie Berry Trifle
This is one of my favorite desserts to bring to parties because it looks super impressive even though it is very easy! However, I must say that the key to the presentation is a trifle bowl.
Ingredients
Cut the entire pan of brownies into little bite sized squares and layer in the bottom of your bowl. Top with pudding, then cool whip, then berries. Start over with the brownies again and repeat three times. Voila! Easy as pie (actually way easier).
A few notes:
Ingredients
- One box brownie mix, prepared (I am partial to the Hershey or Ghiradelli triple chunk versions so you get big chunks of chocolate surprises in your trifle)
- Two small boxes of chocolate pudding mix, prepared (You need 8 oz total, so the larger 6 oz box isn't quite enough. I have even used the sugar free, fat free mix before and it was still delic!)
- 8 oz container of cool whip (I use light and you can't tell the difference)
- Frozen or fresh berries (I love the mixed bag of frozen blueberries, blackberries, and raspberries with a few fresh strawberries mixed in.)
Cut the entire pan of brownies into little bite sized squares and layer in the bottom of your bowl. Top with pudding, then cool whip, then berries. Start over with the brownies again and repeat three times. Voila! Easy as pie (actually way easier).
A few notes:
- If you use frozen berries, they tend to bleed all over the cool whip on top and ruin the presentation. Rinse the ones for the top layer in a colander first. They will still bleed, but not nearly as much. I don't rinse the inside ones because the berry juice soaking into the brownies is what makes it so, so good. :)
- Sometimes I do a smaller version of just two layers. The 6 oz pudding box is perfect for this.
Wednesday, July 21, 2010
Pavlova

This recipe was contributed by Sarah McKenna. It is from a Silver Palate Cookbook.
My husband spent two years in Australia on a religious mission for The Church of Jesus Christ of Latter-day Saints. While there, this was his definite favorite Australian delicacy. Every time that I eat it I am shocked by how rich and delicious it is, especially since it's basically just egg whites and sugar! Additionally, since it is basically just egg whites, it is not all that bad for you! We have been doing Weight Watchers together, so we make this treat anytime we have people over now because it is relatively low in points. A sixth of the pavlova---which is a sizable amount!---WITH the whipped cream is only 7 points on the old WW system (an eighth is 6 points) and on the NEW system a sixth is only 4 points (an eight is 3 points). If you are someone who is satisfied with Cool Whip instead of real whipped cream (Um, LAME!) then you can drop your points to 3 per slice on the old system and 0 points per slice on the new system. Um, WOW . . . . maybe I should reconsider my stance on Cool Whip.
Anyway, I made this last night for a card making club that I was hosting and it got RAVE reviews. In fact, I got so many requests for the recipe that I decided to just post it on this blog. You will definitely need an electric hand mixer, and a spring form (cheesecake) pan is best for baking, but a round pan of any sort would probably work. It is best with this recipe to have everything out on the counter and ready to use so there isn't much down time in the beating process.
And, yes, it is named after the famous ballerina. On to the recipe . . . .
Pavlova
4 egg whites
1/4 teaspoon salt
1/4 teaspoon cream of tartar
1 cup sugar
4 teaspoons cornstarch
2 teaspoons white wine vinegar (I just use white because it's what I keep on hand.)
1 teaspoon vanilla extract
1 cup heavy cream, whipped
2 to 3 cups fresh berries (Strawberries are our favorite!)
1. Preheat oven to 275 degrees.
2. Beat egg whites, salt, and cream of tartar together in a bowl until the whites hold a stiff peak.
3. Add the sugar, a few tablespoons at a time, beating until mixture is stiff and glossy.
4. Beat in the cornstarch, then the vinegar and vanilla.
5. Butter and flour (baking PAM!) an 8 inch spring form pan and fill gently with the meringue mixture, spreading it slightly higher around the edges than in the center of the pan to form a depression. (You barely have to do this at all!)
6. Bake cake for 1 to 1 1/4 hours, or until meringue is firm and lightly browned. Pavlova will remain moist inside. Cool slightly, unmold, slide onto a serving plate, and cool completely.
5. Lightly whip cream just before serving and prepare berries.
6. Serve with whipped cream and berries on top.
Tuesday, June 29, 2010
Strawberry Cream Cake

This recipe was contributed by Sarah McKenna.
Laura and I both happened to be in Colorado with our dad on Father's Day, and he requested that we make him this cake. It is one of his favorites that my mom used to make, and Laura and I had forgotten about. It is easy, yummy, and tastes very summery and fresh. (It tastes a lot better than it looks, I promise!)
Strawberry Cream Cake
 1 - 10" prepared angel food cake
1 - 8 oz. package cream cheese, softened (We used the 1/3 less fat kind.)
1 - 14 oz. can sweetened condensed milk (We used fat free.)
1/3 cup lemon juice
1 tsp. almond extract
2 cups sliced fresh strawberries
(Optional: whipped cream or cool whip on top)
Cut a thin slice (1" max) crosswise from the top of the cake with a sharp knife. Hollow out the center of the cake, leaving approximately 1" thick walls and base. Reserve cake pieces. Beat cream cheese until fluffy. Beat in sweetened condensed milk until smooth. Stir in lemon juice and almond extract. Mix well. Stir in reserved torn cake pieces and strawberries.
Fill the cavity of the cake with the mixture. Replace the top of the cake. Chill for three hours. Top with whipped cream or cool whip and fresh strawberries if desired.
Wednesday, May 12, 2010
Devil's Food Cake Mix Cookies

Devil's Food Cake Mix Cookies
1 box devils' food cake mix
1/2 cup of butter, softened
2 eggs
1/2 bag of any kind of chocolate chips you want (or a full bag, if you'd like!)
(Emily usually uses the Andes mint pieces---Yum!---but has also used peanut butter chips, white chocolate chips, regular chocolate chips, etc.)
Mix all the goodies together. (The dough is pretty stiff and sticky.)
Bake at 350 for 8-10 minutes.
Tuesday, May 4, 2010
The Most Divine Low-Fat Cake in the World

Contributed by Rachel Nielson
My friend, Laney Hawes, has made this cake for me twice, and I can't get over how delicious it is. She got it out of a Weight Watchers cookbook--WEIGHT WATCHERS???!!! This cake is so good that I would pick it even if it weren't low-fat. It is soooooooooo yummy,
1 box of cake mix (any flavor you want works, I use white for the one I make)
2 1/2 cups of diet soda (I used 7-up)
3 egg whites
The cake mix seems really runny, but it bakes up really nicely. Bake at 350 for 25-30 minutes or until its done. Don't over cook it.
Topping:
1 small container of fat free cool whip
1 small box of sugar free pudding mix or sugar free jello (I use pistachio)
1 cup of diet soda (I used 7-up again)
Mix it all together and spread over the cake. I found that if I let the cool whip get to room temp and mix it with the pudding mix, it dissolves better than if the cool whip is really cold. Then I add the 7-up. And the cake is best if it is left in the fridge for a few hours or even over night.
Wednesday, April 14, 2010
Genie's Chocolate Sauce
This recipe for homemade hot fudge sauce was contributed by Ann Brown via Sarah McKenna. It is her grandma's recipe. And it is divine!
Genie's Chocolate Sauce
6 oz (1 cup / half of a standard sized bag) of semi sweet chocolate chips
1/2 cup butter
1 1/3 cup evaporated milk (just under one full can)
2 cups powdered sugar
1 tsp vanilla
Slowly melt chocolate chips and butter. Add other ingredients and boil for 8 minutes. Serve over ice cream or pound cake.
Friday, January 15, 2010
Filled Lemon Cupcakes
This recipe was contributed by Chrissy Carlson via Sarah McKenna. Chrissy says that these divine cupcakes are her favorite, but they are only for the truly sweet-teethed out there. A few variations that she has tried are listed below the recipe for those of you who are big lemon people. (I can't wait to try to chocolate variation......yumm......)
Filled Lemon Cupcakes
For 12-18 cupcakes, you need:
1 package lemon-flavored cake mix (and all of the ingredients that you need in order to mix together the mix....eggs, oil, etc.)
1 dry package cheesecake pudding mix
2 cartons lemon-flavored frosting
2-3 cups powdered sugar
lemon candies
Mix the cake, adding the pudding mix as a last step. When filling the cupcake tin, alternate every other cup, and fill each one almost full. You want it to spill over the sides a little...don't worry, just grease the pan well. (This is why one box of cake mix won't quite make the usual 2 dozen cupcakes.) Bake and cool.
Mix together the canned frosting and powdered sugar. Using the long end of a wooden spoon. Poke a hole through the top of the cupcake all the way to the bottom, so that there is a tunnel running from top to bottom. Pipe the lemon frosting into the cupcake until the top starts to bulge. That's how you know it's full of yummy frosting. Then you can swirl some more icing around the top, and top the whole thing with a lemon candy, right in the center. Repeat for all of the cupcakes.
Other yummy variations I've tried:
*Chocolate cake with chocolate frosting and chocolate chips on top
*Chocolate cake with chocolate frosting and chocolate chips on top
*Spice or carrot cake with cream cheese frosting and a candy corn or candy pumpkin on top
Subscribe to:
Posts (Atom)